Gnome crochet pattern

Free Gnome crochet pattern
In this article I will share with you the Gnome crochet pattern designed by @sweetoddityart. If you share this crochet pattern please credit the designer.
Pattern Details
Size: 15 inches from bottom to top of hat with weight 4 yarn and a 3.25 mm hook
Skill Level Needed: Intermediate- suitable for novice crocheters, requires patience and precisions when assembling the gnome and basic crochet skills.
Materials Needed:
Yarn: Worsted Weight #4, approximately 100g of main color, 50-75g of accent colors
Color A: Body color
Color B: Hat color
Color C: Nose color
Color D: Mitten color
Color E: White
Hook Size: D Hook or 3.25 mm
Scissors, sewing needle, stitch marker, fiberfill stuffing
Abbreviations:
mr = magic ring- crochet single crochet stitches in to the adjustable loop
ch = chain stitch
sc = single crochet stitch
hdc = half double crochet
sl = slip stitch
dc = double crochet stitch
inc = increase- make two single crochet stitches in the same stitch
dec = decrease- crochet two stitches together using the decrease method
(4 sc, inc) x 6 = repeat the pattern between parentheses 6 times
BLO = back loops only
F/O = Fasten off
FLO = front loops only
Notes for Gnome crochet pattern:
• Do not join rounds unless stated, work in a continuous spiral
• Use a stitch marker to mark the beginning of each round
• All stitches are worked in both loops unless stated otherwise in the pattern
Body:
Crocheted from bottom to top of body
With Color A:
1. Make 6 sc into a magic ring= 6
2. Increase in each st around= 12
3. (sc, inc) x 6= 18
4. (2 sc, inc) x 6= 24
5. (3 sc, inc) x 6= 30
6. (4 sc, inc) x 6= 36
7. (5 sc, inc) x 6= 42
8. BLO (6 sc, inc) x 6= 48
9. (7 sc, inc) x 6= 54
10. (8 sc, inc) x 6= 60
11. (9 sc, inc) x 6= 66
12-15. sc in each st around
16. (20 sc, dec) x 3= 63
17. sc in each st around
18. (19 sc, dec) x 3= 60
19. (18 sc, dec) x 3= 57
20. sc in each st around
21. (17 sc, dec) x 3= 54
22. (16 sc, dec) x 3= 51
*cut a cardboard circle approximately 3 ½ inches diameter around, insert in the bottom of the body if you want the bottom to stay flatter*
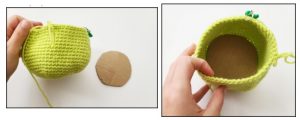
23. sc in each st around
24. (15 sc, dec) x 3= 48
25. sc in each st around
26. (14 sc, dec) x 3= 45
27. sc in each st around
Start stuffing the body
28. (13 sc, dec) x 3= 42
29. sc in each st around
30. (12 sc, dec) x 3= 39
Body:
31. BLO sc in each st around
32. (11 sc, dec) x 3= 36
33. (10 sc, dec) x 3= 33
34. (9 sc, dec) x 3= 30
35. (3 sc, dec) x 6= 24
36. (2 sc, dec) x 6= 18
37. (sc, dec) x 6= 12
38. dec x 6= 6
F/O and sew the hole closed
Hat:
With Color B:
1. Make 6 sc into a magic ring= 6
2. (inc, 2 sc) x 2= 8
3. (inc, 3 sc) x 2= 10
4. sc in each st around
5. (inc, 4 sc) x 2= 12
6. (inc, 3 sc) x 3= 15
7. sc in each st around
8. (inc, 4 sc) x 3= 18
9. sc in each st around
I did not stuff my hat
10. (inc, 5 sc) x 3= 21
11. (inc, 6 sc) x 3= 24
12. sc in each st around
13. (inc, 7 sc) x 3= 27
14. (inc, 8 sc) x 3= 30
15. sc in each st around
16. (inc, 9 sc) x 3= 33
17. (inc, 10 sc) x 3= 36
18. sc in each st around
19. (inc, 11 sc) x 3= 39
20. (inc, 12 sc) x 3= 42
21. sc in each st around
22. (inc, 13 sc) x 3= 45
23. (inc, 14 sc) x 3= 48
24. sc in each st around
25. (inc, 15 sc) x 3= 51
26. (inc, 16 sc) x 3= 54
27. Sc in each st around
28. (inc, 17 sc) x 3= 57
29. (inc, 18 sc) x 3= 60
30. Sc in each st around
F/O and leave a long tail for sewing
Arms(Make 2):
Starting with color D:
Right Arm:
1. Make 6 sc into a magic ring= 6
2. Increase in each st around= 12
3. sc in each st around
4. 4 dc cluster, ch 1, 11 sc= 12
*See pg.15 for help with the cluster st*
5. (do not work off the ch 1 from the previous round) (4 sc, dec) x 2= 10
Change to Color E:
6. FLO sc in each st around
Change to Color A:
7. BLO sc in each st around
8-10. sc in each st around
11. Dec, 8 sc= 9
12-14. sc in each st around
15. Dec, 7 sc= 8
16-17. sc in each st around
18. Work 3 sc, fold the arm in half and sc the opening closed. F/O and leave a long tail for sewing.
Starting with Color D:
Left Arm:
1. Make 6 sc into a magic ring= 6L
2. Increase in each st around= 12
3. Sc in each st around
4. 11 sc, ch 1, 4 dc cluster= 12
*See pg. 15 for help with the cluster st*
5. (do not work off the ch 1 from the previous round) (4 sc, dec) x 2= 10
Change to Color E:
6. FLO sc in each st around
Change to Color A:
7. BLO sc in each st around
8-10. Sc in each st around
11. Dec, 8 sc= 9
12-14. Sc in each st around
15. Dec, 7 sc= 8
16-17. Sc in each st around
18. Work 3 sc, fold the arm in half and sc the opening closed. F/O and leave a long tail for sewing.
Nose:
With Color C:
1. Make 6 sc into a magic ring= 6
2. Increase in each st around= 12
3. (sc, inc) x 6= 18
4. (2 sc, inc) x 6= 24
5. sc in each st around
6. (2 sc, dec) x 6= 18
7. (sc, dec) x 6= 12
8. dec x 6= 6
F/O and leave a long tail for sewing
Legs(Make 2):
Starting with Color A:
1. Make 4 sc into a magic ring= 4
2. Inc, sc, dec= 4
3. inc x 2, 2 sc= 6
4. inc x 2, 4 sc= 8
5. inc x 2, 6 sc= 10
6. inc x 2, 8 sc= 12
7. sc in each st around
8. (sc, inc) x 6= 18
9. sc in each st around, work 6 sc more to move the stitch marker
10. Ch 1, work 16 sc
11. Ch 1, turn, work 16 sc
12. Ch 1, turn, 6 sc, dec x 2, 6 sc= 14
13. Ch 1, turn, dec, 3 sc, 4 hdc, 3 sc, dec= 12
14. Ch 1, turn, dec, 3 sc, 2 hdc, 3 sc, dec= 10
15. Ch 1, turn, dec, 6 sc, dec= 8
16. Ch 1, turn, dec, 4 sc, dec= 6
17. Ch 1, work 18 sc. Work the sc on the sides of the foot, across the front, and on the top of the foot.
18. sc in each st around
Start stuffing the foot
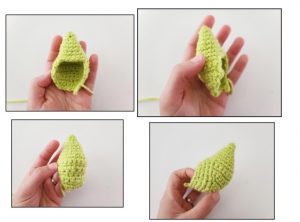
Legs Continued:
19. (4 sc, dec) x 3= 15
Change to Color E:
20. FLO sc in each st around
Change to Color D:
21. work in Back loops from round 20: sc in each st around
22-23. sc in each st around
24. Dec, 13 sc= 14
25-27. sc in each st around
28. (5 sc, dec) x 2= 12
Stop stuffing the legs
29-31. sc in each st around
32. (4 sc, dec) x 2= 10
33-35. sc in each st around
F/O and leave a long tail for sewing
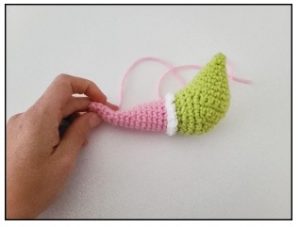
Beard(Optional):
With Color E:
1. Make 6 sc into a magic ring= 6
2. (sc, inc) x 3= 9
3. (2 sc, inc) x 3= 12
4. sc in each st around
Do not stuff the beard
5. (3 sc, inc) x 3= 15
6. (4 sc, inc) x 3= 18
7. sc in each st around
8. (5 sc, inc) x 3= 21
9. (6 sc, inc) x 3= 24
10. (7 sc, inc) x 3= 27
11-12. sc in each st around
13. (8 sc, inc) x 3= 30
14-16. sc in each st around
Fold the beard in half and sc the opening closed.
Assembly
Head and Body:
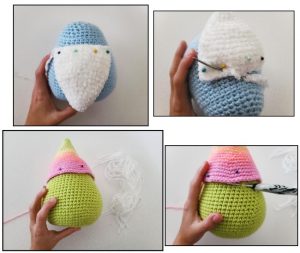
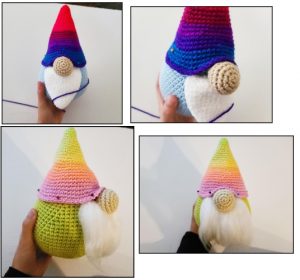
1. If you crocheted the beard. Place the beard approximately between rounds 27 and 28
of the body. Sew the beard onto the face.
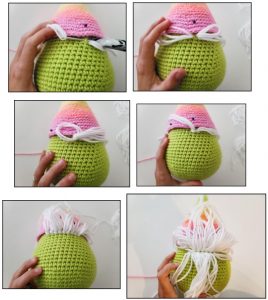
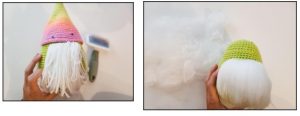
2. If you want the brushed beard look. Attach a row of double stranded yarn approximately between rounds 27 and 28. You will want 18 strands of white yarn cut approximately 6 inches in length.
Make one row. Then repeat 2 more rows underneath that first row. Brush the yarn out with a wire pet brush. You will lose a lot of yarn during this process.
 Nose:
Nose:
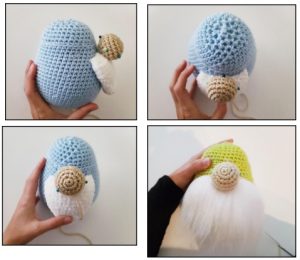
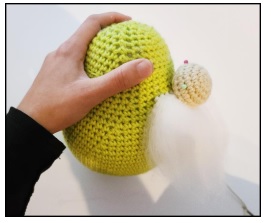
1. Pin the nose above your beard.
2. Sew the nose onto the body.
Hat:
1. Pin the hat onto the head going around the nose.
2. Sew the hat onto the head but not onto the nose.
Arms:
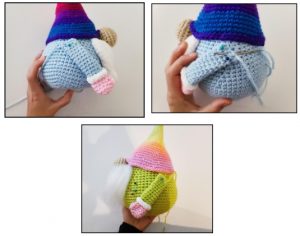
1. Pin the arms onto the side of the body.
2. Sew the arms onto the body.
Legs:
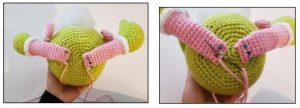
1. Turn the body upside down and pin the legs onto the bottom of the body.
2. Sew the legs onto the body.
So we are done. Wish you success. If you have any problems related to this Gnome crochet pattern, please leave a comment or email me at: ngoclanhandmade.com@gmail.com
