Baby Dragonite crochet pattern

Free Baby Dragonite crochet pattern
This is a free recipe made with love for the AmiGeekWeek Project. This recipe was created and developed by Vitória Ferreira (@amigurumisdavit).
If you copy Baby Dragonite crochet pattern, don’t forget to credit the author @amigurumisdavit, use the tag #amigeekweek and our website ngoclanhandmade. You are allowed to sell and give away completed amigurumi! Have a nice time!
Materials:
– Yarns in colors:
Orange
Blue
White
Beige
– 2.0mm crochet hook
– Universal/silicone glue
– 10mm black eyes
– Wire
– Filling
– Tapestry needle
Abbreviations for Baby Dragonite crochet pattern:
MR – magic ring
ch – chain
sc – single crochet
sl st – slip stitch
dec – decrease
inc – increase
incT – triple increase
BLO – back loop only
FLO – front loop only
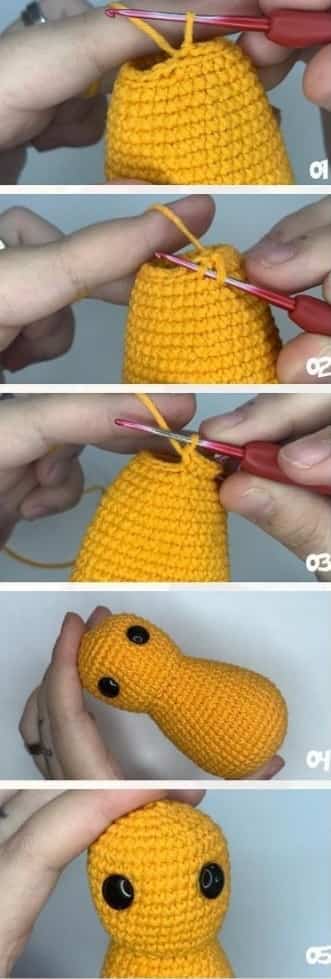
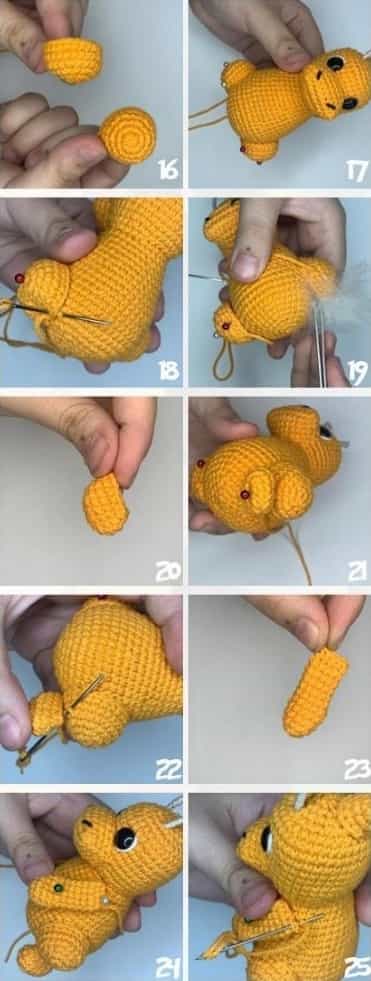
Body and head
With the orange thread
1. 6sc in MR
2. 6 inc (12)
3. (1sc, 1inc) x6 (18)
4. (2sc, 1inc) x6 (24)
5. (3sc, 1inc) x6 (30)
6. (4sc, 1inc) x6 (36)
7. (5sc, 1inc) x6 (42)
8. (6sc, 1inc) x6 (48)
9-12. 48sc (4 rows)
13. (6sc, 1dec) x6 (42)
14-16. 42sc (3 rows)
17. (5sc, 1dec) x6 (36)
18-20. 36 sc (3 rows)
21. (4sc, 1dec) x6 (30)
22. 30sc
23. (3sc, 1dec) x6 (24)
24. Blo: 24sl st
The next row will be done in flo, that is, picking up the loops left over from row 24.
25. Flo: (3sc, 1inc) x6 (30)
26. (4sc, 1inc) x6 (36)
27-34. 36sc (8 rows)
Place the eyes between rows 31 and 32, 6 stitches apart.
35. (4sc, 1dec) x6 (30)
36. (3sc, 1dec) x6 (24)
37. (2sc, 1dec) x6 (18)
38. (1sc, 1dec) x6 (12)
39. 6 dec (6)
Close in inverted MR.
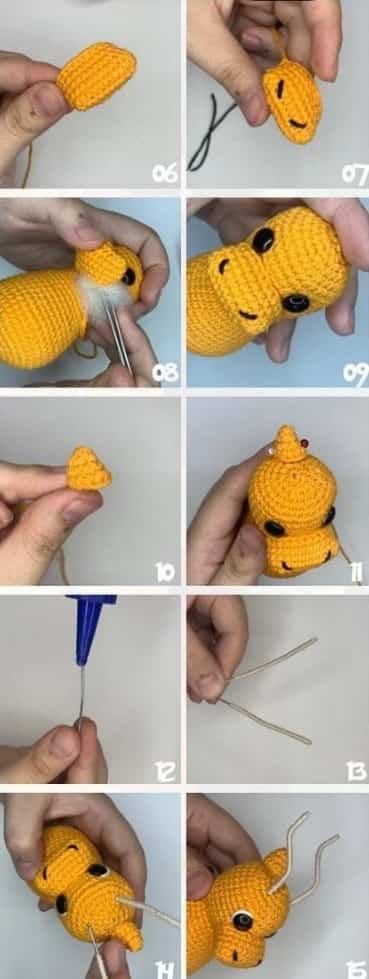
Snout
With the orange thread
12 chain
1. Return from the second stitch of the chain doing 10sc, inc, continue on the other side of the chain doing 9sc, 1 inc (24)
2-5. 24 sc (4 rows)
Cut leaving thread for sewing. Embroider the nostrils with black thread. Sew the snout just on the line below the eyes. Before finishing sewing, add stuffing.
Mener horn
With the orange thread
1. 6sc in MR
2. 6sc
3. 6 inc (12)
4. 12sc
Cut leaving thread for sewing. Sew to the top of the head, about 2 rows below the magic ring. Before completing the seam, add stuffing.
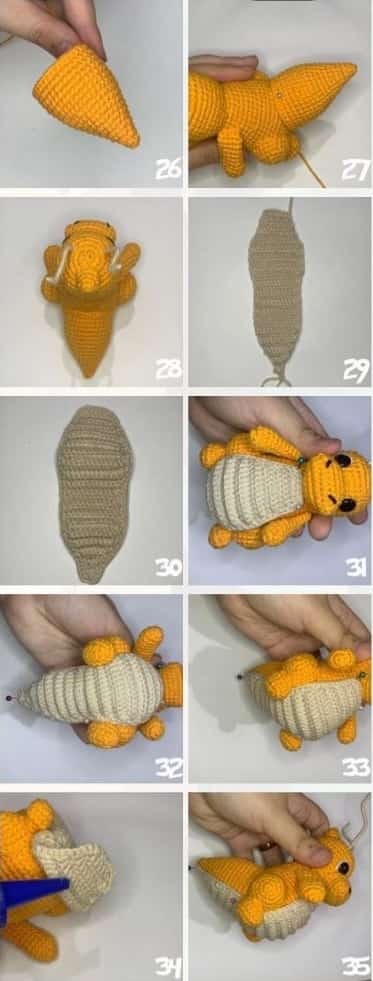
Major horn
Cut two pieces of wire about 12cm long. Apply a little glue to the end of the wire and start wrapping the beige wire around the piece. Leave about 3cm unrolled. Glue the thread and finish. Fit the bare wire into the head and apply a little glue to make it stay in place. Using pliers, shape the horns.
Legs (x2)
Bigger part
With the orange thread
1. 6sc in MR
2. 6 inc (12)
3. (1sc, 1inc) x6 (18)
4. (2sc, 1inc) x6 (24)
5-6. 24sc (2 rows)
Cut leaving thread for sewing.
Smallest part
With the orange thread
5 ch
1. Return from the second stitch doing 3 sc, inc, continue doing on the other side of the chain 2sc, 1inc (10)
2. 1inc, 2sc, 3 inc, 2sc, 2 inc (16)
3-4. 16sc (2 rows)
5. 4sc, 4dec, 4sc (12)
Cut leaving thread for sewing.
Sew the larger part between rows 7 and 14. Before completing the seam, add stuffing. Position the smaller part below the larger part and also sew. Add filling.
Arms (2)
With the orange thread
1. 6sc in MR
2. 6inc (12)
3-5. 12sc (3 rows)
6. (4sc, 1dec) x2 (10)
7-11. 10sc (5 rows)
Take both sides of the piece and close by making 5 sc. Sew the arms diagonally starting at row 23.
Tail
With the orange thread
1. 6sc in MR
2. 6sc
3. 6inc (12)
4. 12sc
5. (1sc, 1inc) x6 (18)
6. 8sc
7. (2sc, 1inc) x6 (24)
8. 24sc
9. (3sc, 1inc) x6 (30)
10. 30sc
11. (4sc, 1inc) x6 (36)
12-18. 36sc (7 rows)
Assembly
Cut leaving thread for sewing. Position the tail on the back of the body with a pin so that your dragonite stands perfectly upright with the support of the tail. Sew and fill before completing the seam.
Stomach
With beige thread
Attention: in all rows you must do 1 chain and turn the work. All rows are done in blo.
8 chain
1. Return from the second stitch making 7sc, 1ch and turn
2. 1inc, 5sc, 1inc (9)
3. 9sc
6. 1inc, 7sc, 1inc (11)
7. 1 inc, 11sc, 1inc (15)
8-13. 15sc (6 rows)
14. 1dec, 11sc, 1dec (13)
15-25. 13sc (11 rows)
26. 1dec, 9sc, 1dec (11)
27. 11sc
28. 1dec, 7sc, 1dec (9)
29. 9sc
30. 1dec, 5sc, 1dec (7)
31. 1dec, 3sc, 1dec (5)
32. 1dec, 1sc, 1dec (3)
Pass sc around the entire piece.
Assembly
Position the piece across the body, including the belly and tail. Glue the реса ао согро.
Asus (x4)
Make two in orange and two in blue
Attention: in all rows you must do 1 chain and turn the work at the beginning of each row
5 ch
1. Return from the second stitch making 4 sc, 1 ch and turn
2-5. 4sc
6. 1inc, 2sc, 1inc (6)
7. 1inc, 4sc, 1inc (8)
8. 1inc, 6sc, 1inc (10)
9. 1inc, 8sc, 1inc (12)
10. 1inc, 11sc (13)
11. 12sc, 1inc (14)
12. 14sc, 3ch
13. Go back from the second chain and make 2 sc, continue weaving on the wing and make another 14sc
14. 1dec, 10sc, 1dec (14)
15. 1dec, 8sc, 1dec (12)
16. 1dec, 6sc, 1dec (10)
17. 1dec, 4sc, 1dec (8)
18. 1dec, 2sc, 1dec (6)
19. 1inc, 1sc, 1dec (5)
20. 3sc, 1 inc (5)
21. 1inc, 4 sc (6)
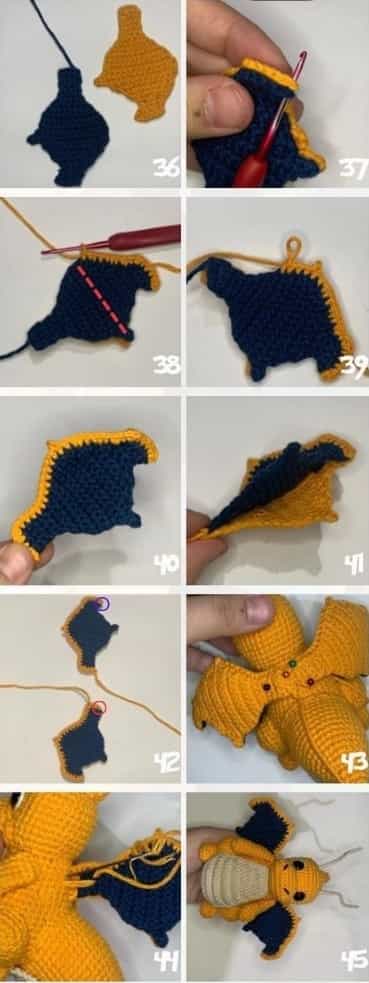
Cut and finish.
When all the wings are ready, we will join them together. Place one wing on top of the other, so the blue wing is in front. Hook the orange thread to one end of the wing and create a scale shape.
When you reach the top of the wing, in the same direction that we made those chains at the bottom (marked with the straight red line in picture 38), make 1 picot stitch. There is no suitable score here, follow the photos to help you. Note, you must start one wing at one end and the other wing at the other end so that both are facing forward, following picture 42, you start one wing circled in red and the other wing is circled in red. circled in blue, the lower part of the wing we will not connect with thread, so apply glue and glue the two parts together. Once ready, simply position and sew to the back.
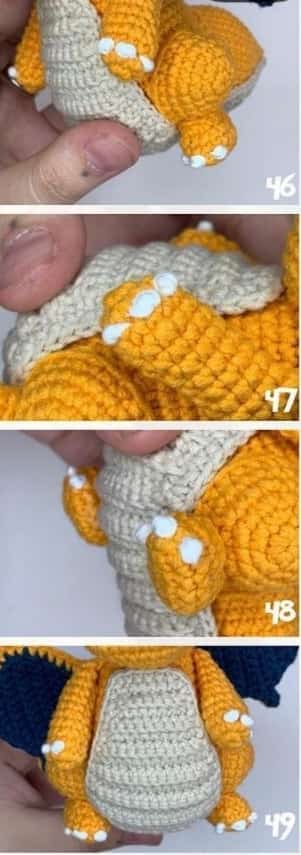
Nail
Use white thread to embroider French knots on both arms and legs.
![]()
Wishing you good luck with Baby Dragonite crochet pattern. Don’t forget to follow our website ngoclanhandmade.com and Youtube channel @ngoclanhandmade regularly to receive free crochet patterns.