How to crochet a Baseball Cap
How to crochet a Baseball Cap
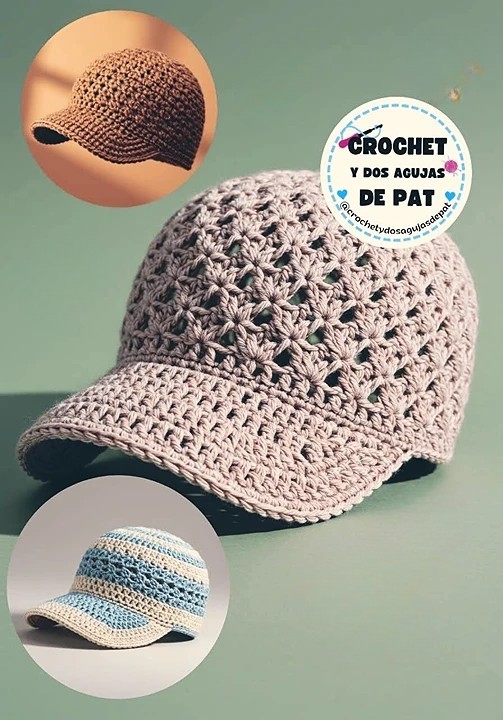
Hello everyone. Today I will share with you how to crochet a Baseball Cap. Hope you will like it and have relaxing moments and all the patterns here are shared by me for free, there will be no payment required. I collected this crochet pattern from @Crochet y dos agujas de Pat.
Hey there! Knitting a hat with crochet visor is a very cute and useful project. Here I explain the general steps and some considerations so you can do it:
Materials you’ll need:
* Wool or yarn: Choose your preferred material and thickness. For a cozier hat, thick wool is ideal. For something lighter, a cotton or acrylic yarn will work just fine.
* Crochet Needle: The size of the needle will depend on the thickness of the yarn you choose. The thread label usually indicates the recommended needle size.
* Scissors
*Flower needle: To hide the ends of the thread.
* Point Markers (optional): They can be useful for marking the start of laps or specific points.
Basic hat body pattern:
Let’s start by knitting a flat circle that will then become the top of the hat.
*Magic ring (or initial chain):
*Magic Ring: Make a ring with the thread leaving a long strand. Insert the needle into the ring, take thread and make a lazada. This secures the ring.
* Initial chain: If you prefer not to make a magic ring, you can make 4 or 5 chains and close them with a sliding point to form a circle.
*First turn: Inside the magic ring (or the chain circle), weave low points (pb) or high points (pa), as you prefer. Quantity will depend on the thickness of the thread and how flat you want the center to be. Generally, they are between 6 and 12 low points or between 12 and 16 high points. Close the lap with a slip point in the first point.
* Second lap and following (increase): In order for the circle to continue growing flat, you need to make increments on each lap.
The way you make the increases will depend on the point you’re using:
*Low point (pb): Make 2 low points on each point of the previous lap.
*High point (pa): Make 2 high points on each point of the previous lap.
* Continue Increasing: In the following rounds, distribute the increments evenly so that the circle is flat and does not wobble or make a cone. A common way to do it is:
*Lap 3: *1 pb (or pa), 1 raise*. Repeat *around* around.
*Lap 4: *2 pb (or pa), 1 raise*. Repeat *around* around.
*Lap 5: *3 pb (or pa), 1 raise*. Repeat *around* around.
* And so on, increasing the number of points between increases on each lap.
* Reach desired size: Continue to knit in a circle and increase until the diameter of the circle is approximately the width of the top of the head of the person you are knitting the hat for. You can measure a hat that fits him well for reference.
* Straight Weave (No Upgrades): Once you have the right diameter, start weaving laps without upgrades. Just knit a stitch in each stitch on the previous lap. This will cause the tissue to start going down and form the body of the hat. Keep knitting until the hat has the long desired one, just before where you want the visor to start.
Knitting the visor:
The visor is generally woven in rows of back and forth, rather than in a circle.
*Mark Visor Location: Fold cap in half to find the front. Mark with a dot marker the width you want the visor to be. Generally, it occupies about one-third of the total width of the hat.
* Join Thread: Join the thread in one of the points marked.
* First row of the visor: Make an ascending chain (the amount will depend on the point you use: 1 for pb, 3 for pa) and then weave points (usually high points or mid-high points) to the other marker. Spins the tissue.
* Next rows of the visor (increases): To give the visor a curved shape, increases are generally made at the ends of some rows. You can make increments at each end every two rows, for example. A raise consists of knitting two stitches at the same point.
* Continue weaving: Continue weaving back and forth rows, making increases as needed to give the desired shape to the visor. The number of rows will depend on how long and pronounced you want the visor.
* Visor Shaping (Optional): At the end, you can weave a round of low points around the edge of the visor to give it a cleaner, firmer finish.
Termination:
*Close the weave: Cut the yarn leaving a strand long enough to hide it. Pass the wool needle through the last stitch and then hide the thread inside the fabric.
* Hide all loose strands: Make sure you hide all strands of the beginning and end of the weave well.
Additional Tips:
*Dots: You can use the point you like best for the body of the hat. The high point is common because it knits fast and has a good fall. The low stitch creates a denser tissue.
* Tension: Maintain a constant tension in the thread to keep the fabric even.
* Measurements: It is important to measure the head of the person you are knitting the hat for to ensure the size is correct.
*Variations: You can add details such as color changes, different textures or a special hem to the hat.
* Firmer Visor: If you want the visor to have more structure, you can cut a piece of hard plastic (such as a water bottle or a folder) into the shape of the visor and sew it inside before doing the final lap of finishing.
All the patterns here are shared by me for free, there will be no payment required. Wishing you good luck with free Baseball Cap crochet pattern. Don’t forget to follow our website ngoclanhandmade.com and Youtube channel @ngoclanhandmade regularly to receive free crochet patterns.