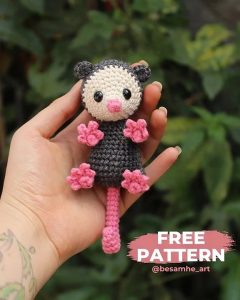
Mouse Mia & Marvin crochet pattern

Princess mouse pattern
This crochet pattern is very beautiful, so I collected it. I have credited the author at the end of the article. Now we’ll get started.
MATERIALS
2.5MM HOOK & DK WEIGHT YARN
MARVIN: GREY, PEACH, RED & BLUE
MIA: WHITE, PEACH, GREEN, YELLOW, PINK, LIGHT BLUE & PURPLE EMBROIDERY THREAD, EMBROIDERY NEEDLE, TOY STUFFING, 3 X 6MM BUTTONS
FINISHED SIZE: 9CM
ABBREVIATIONS
MR – MAGIC RING
SC – SINGLE CROCHET
HDC – HALF DOUBLE CROCHET
INC – INCREASE (X 2 SC IN 1 ST)
DEC – DECREASE (SC 2 STS TOGETHER)
ST (S) – STITCH/STITCHES
SL ST (S) – SLIP STITCH/STITCHES
CH (S) – CHAIN/CHAINS
BLO – BACK LOOP ONLY
FLO – FRONT LOOP ONLY
F/O – FASTEN OFF
RND – ROUND
HEAD
Using ‘Grey’ yarn
Rnd 1: 6 sc in to mr (6)
Rnd 2: (inc) x 6 (12)
Rnd 3: (1 sc + inc) x 6 (18)
Rnd 4: 1 sc, inc (2 sc + inc) x 5, 1 sc (24)
Rnd 5: (3 sc + inc) x 6 (30)
Rnd 6-11: (6 rnds): 30 sc (30)
Rnd 12: 4 sc, dec (8 sc + dec) x 2, 4 sc (27)
Rnd 13: (7 sc+ dec) x 3 (24)
Rnd 14: 3 sc, dec (6 sc + dec) x 2, 3 sc (21)
Rnd 15: (5 sc+ dec) x 3 (18)
STUFF & CONTINUE TO STUFF UNTIL RND 17
Rnd 16: 2 sc, dec (4 sc + dec) x 2, 2sc (15)
Rnd 17: (3 sc + dec) x 3 (12)
Rnd 18: (dec) x 2 (mark with a marker), 8 sc (10)
Rnd 19: (3 sc + dec) x 2 (8)
Rnd 20: (2 sc + dec) x 2 (6)
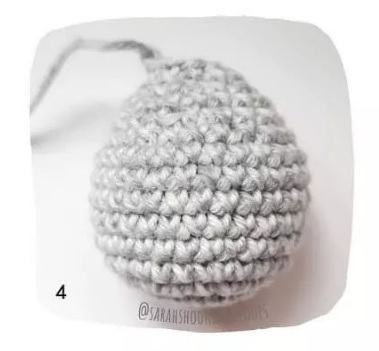
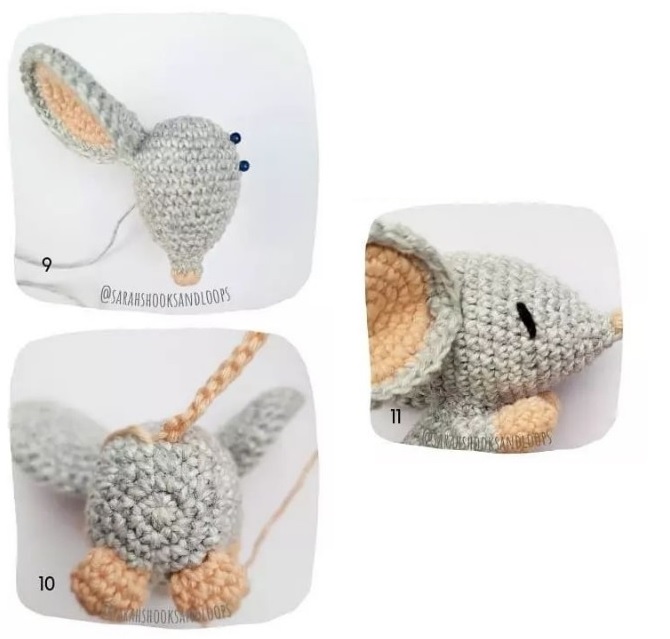
F/O and weave the yarn tail through the FLO of the last round. Gently pull the tail to close the opening and weave in
NOSE
Using ‘Peach’ yarn, bring a length up through the closing round of the head (image 2).
Embroider the nose going over the closing round making sure the position is parallel with the stitch marker (image 3). Remove stitch marker when finished

BODY
Using ‘Grey’ yarn
Rnd 1: 6 sc in to mr (6)
Rnd 2: (inc) x 6 (12)
Rnd 3: (1 sc + inc) x 6 (18)
Rnd 4: 1 sc, inc (2 sc + inc) x 5, 1 sc (24)
Rnd 5: (3 sc + inc) x 6 (30)
Rnd 6-10: (5 rnds): 30 sc (30)
Rnd 11: (3 sc + dec) x 6 (24)
Rnd 12: 1 sc, dec (2 sc + dec) x 5, 1 sc (18)
Rnd 13: 18 sc (18)
STUFF BODY
Rnd 14: (1 sc + dec) x 6 (12)
Rnd 15: 12 sc (12)
FINISH STUFFING
F/O and leave a long tail for attaching the head
ARMS X 2
Start with ‘Peach’ yarn
Rnd 1: 6 sc in to mr (6)
Rnd 2: (1 sc + inc) x 3 (9)
Rnd 3: dec, 2sc, dec, 3 sc (7)
Rnd 4: 7 sc (7)
Change to ‘Grey’
Rnd 5-7 (3 rnds): 7 sc (7)
(Do not stuff)
Fold the end together and sc in the next 3 sts through both layers to close. F/O and leave a long tail for attaching
FEET X 2
Use ‘Peach’ yarn
Rnd 1: 6 sc in to mr (6)
Rnd 2: (1 sc + inc) x 3 (9)
Rnd 3: 9 sc (9)
(Do not stuff)
Make 1 dec in the next st, fold the end together and sc in the next 4 sts through both layers to close. F/O and leave a long tail for attaching
EARS X 2
Using ‘Peach’ yarn; make 2 inner ear pieces
Rnd 1: 6 sc in to mr (6)
Rnd 2: (inc) x 6 (12)
Rnd 3: (1 sc + inc) x 6 (18)
Rnd 4: 1 sc, inc (2 sc + inc) x 5, 1 sc (24)
Rnd 5: (3 sc + inc) x 6 (30)
F/O and weave in all tails
Using ‘Grey’ yarn; make one outer ear piece, repeating the pattern above.
At the end of rnd 5, do not F/O
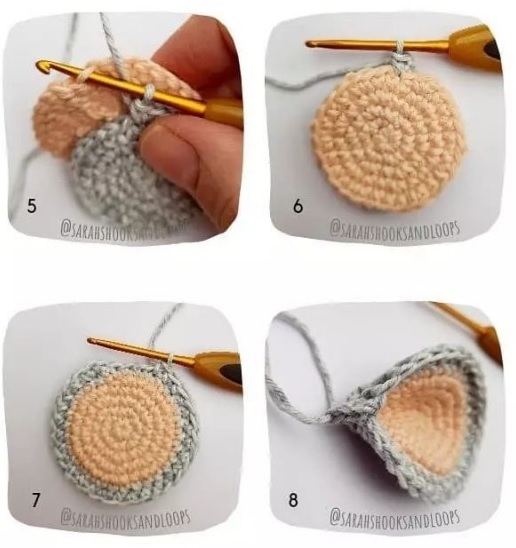
Place the inner and outer pieces together with the backs facing each other. Join by going through the BLO of a stitch of the inner ear piece with a sl st (image 5).
Ch 1, turn work, and sc in the same stitch going through both loops (image 6). Continue to sc in each st around (30)
Make a 2nd round of sc until you have completed 27 sts (image 7). Ch 1, fold the ear and sc into the 1st sc of the 2nd round to join. Turn and make a sc in the next 2 stitches going through both layers to close (image 8).
F/O and leave a long tail for attaching.
Repeat for the 2nd ear.
ASSEMBLY
Head: Attach the head to the body, tilted slightly upwards, over rounds 5 to 10 of the head.
Ears: Attach over rounds 6-8 equally on each side of the head (12 sts apart). To pin the ears back slightly, place a stitch through the back of the ear and into the head, just after where you attached the ear (image 9)
Arms: Attach arms equally on each side of the body and angled slightly upwards between rounds 11 and 14.
Feet: Attach between rounds 4/5 of the of the body, facing forwards and 1 st apart
Tail: Using ‘nude’ yarn, bring up a loop between rnd 4/5 centrally at the back of the body. Ch 33; starting in the 2nd ch from the hook, sl st in each back bump of the chain until you reach the base (using the back bump will make your tail curl). Sl st back into the body. F/O and weave in tails
Eyes: Using black embroidery thread, embroider the eyes, at an angle, over rounds 12 to 13 of the head; 2 sts deep.
SUPER HERO OUTFIT
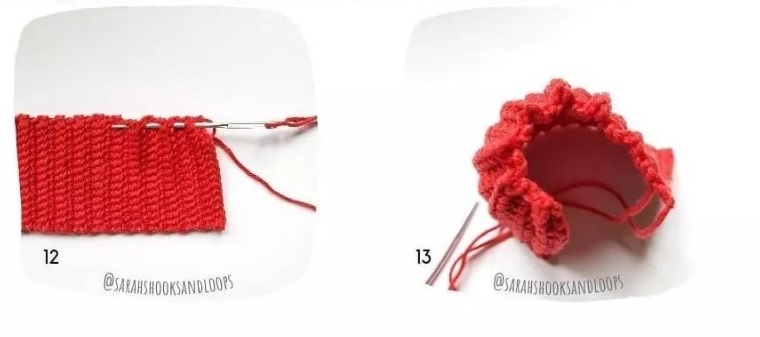
Cape
Using ‘Red’ yarn, Ch 16, starting in the 2nd ch from the hook
Row 1: 15 sc in to the back bump of each chain, ch 1 and turn (15)
Row 2-28 (27 rows): 15 sc into BLO, ch1, turn (15)
Row 29: 15 sc to BLO
F/O with a long tail (ensure you have a tail long enough to weave along the edge and make a button hole for the cape)
Using the long tail, weave the end through the edge of the cape, every 2 rows until the end. Gently pull the tail to gather the edge together (image 12 & 13) – do not cut the yarn
Then pull up a loop one st in from the corner you finished at, and ch 8. Sl st back into the corner to create the button hole loop. Secure and weave in all tails.
On the opposite side of the cape, attach a 6mm button, 1 st in from the corner.
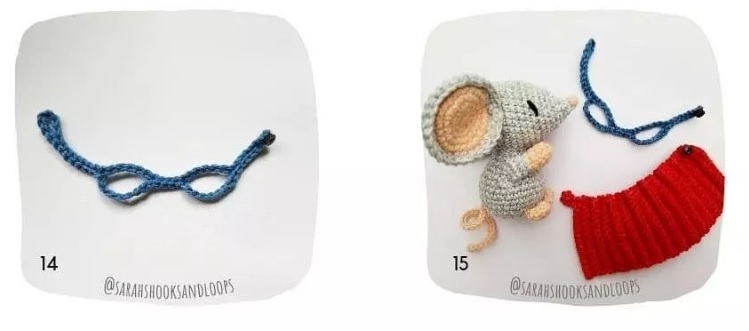
SUPER HERO OUTFIT
Face Mask
Using ‘Blue’ yarn, Ch 38, starting from the 6th ch from the hook; sl st in next 8 ch’s, ch 8 and skip 5 ch’s, sl st in next 4 ch’s, ch 8 and skip 5 ch’s, sl st in remaining ch’s to finish.
F/O and weave in all tails
Attach a 6mm button on the opposite end to the button loop
DRESS MARVIN IN HIS SUPER HERO OUTFIT – READY TO SAVE THE DAY!
PRINCESS MIA
To make Princess Mia, repeat the pattern for the body and embroider the eyes with lashes
Skirt
Using ‘Purple’ yarn Ch 30, sl st into starting ch to join
Rnd 1: 30 sc into back bump of each ch (30)
Rnd 2: 30 sc (30)
Rnd 3: (inc) x 30 (60)
Rnd 4: (1 sc + inc) x 30 (90)
Rnd 5-6 (2 rnds): 90 sc (90)
F/O and weave in ends
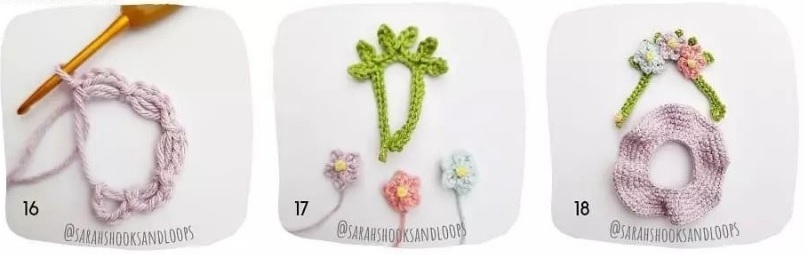
Flower Crown
Make 3 flowers in different colours
Flower: Make a mr, ch 4 and sl st back into mr. Repeat 4 more times to create 5 petals (image 16); pull yarn end to close the mr. F/O and leave a long tail for attaching. Weave in starting tail. For the centre of the flowers, make a French knot using yellow yarn. F/O and weave in tail. Head band: Ch 36; starting in the 6th ch from the hook, sl st in the next 11 ch’s. We will now make the leaves using 1 ch space for each set of 2 leaves *ch 4, sl st in the 2nd ch from hook, HDC in next ch, sl st in next ch*, sl st into the next ch of the band. Repeat *to* for the second leaf and sl st into the same ch space of the band to finish the set (image 17) Sl st into the next 3 ch’s and repeat the above for the next 2 sets of leaves, making 3 sl sts between each set. Once all sets of leaves are complete, sl st in the remaining ch’s. F/O and weave in tails. Attach a 6mm button the opposite end to the button loop and attach flowers to the head band.
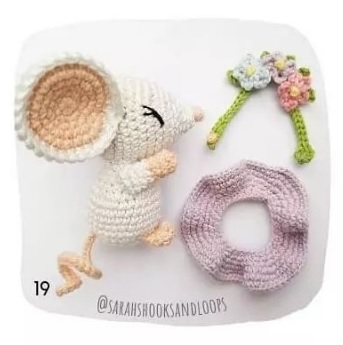
So we are done. I collected this crochet pattern from @SARAHSHOOKSANDLOOPS & #SARAHSHOOKSANDLOOPS
(C) COPYRIGHT 2021 ALL RIGHTS RESERVED. MARVIN THE MARVELOUS & PRINCESS MIA PATTERN DESIGNED BY SARAH’S HOOKS & LOOPS FOR PERSONAL USE ONLY.