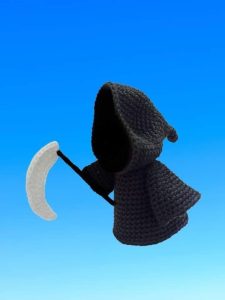
Pumpkin no-face chime crochet pattern
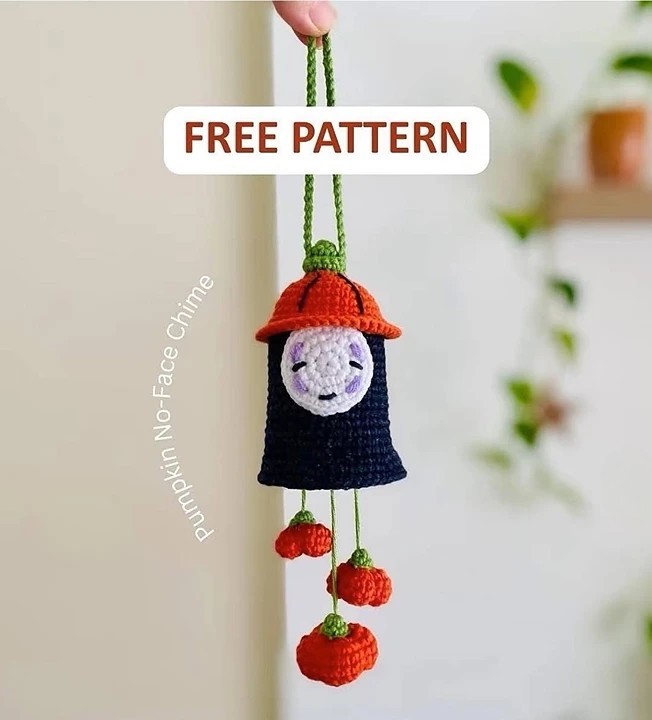
Free Pumpkin no-face chime crochet pattern
Hello everyone. Today I will share with you the Pumpkin no-face chime crochet pattern. Hope you will like it and have relaxing moments. I collected this crochet pattern from @demiwool.
Materials:
1. Yarn: any cotton/sport/DK light weight yarn. I used YarnArt Jeans (4ply, 55% cotton, 45% acrylic)
2. Hook: Size 2.0mm
6. Fiberfill
7. Stitch markers
8. Yarn needle
9. Scissors
10. Pins (optional)
Abbreviations:
MR: magic ring
R: round
st: stitch
ch: chain
sc: single crochet
inc: increase
dec: decrease
slst: slip stitch
FLO: Front Loop Only
BLO: Back Loop Only
Size: If you use the same yarn as me, the No-Face is around 10cm/4in (NOT including the pumpkin bells and the hanging loop).
Color: Black, orange, green, white, a little bit of purple yarn to embroider the purple face stripes of No-Face.
HEAD and BODY
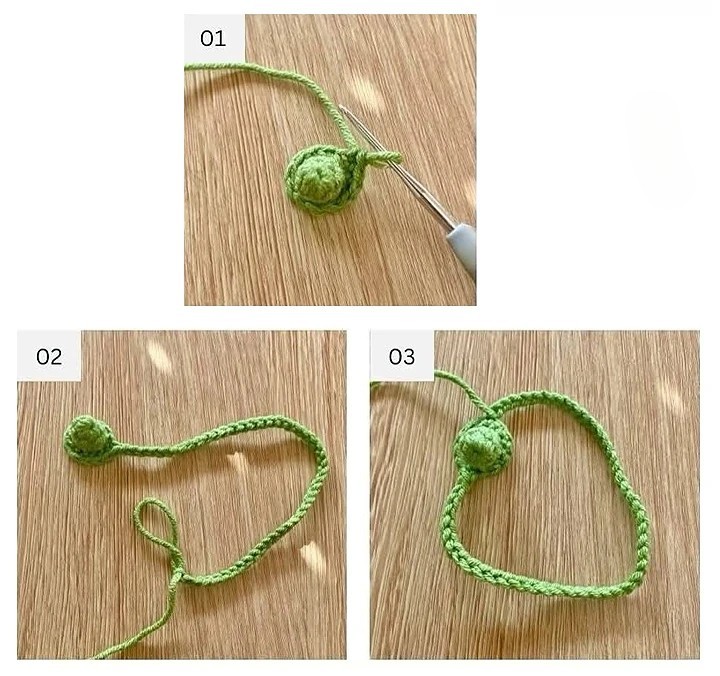
Part 1: Stem – using green yarn
R1: MR 6sc (6)
R2-3 (2 rounds): 6sc (6)
R4: 6inc (12)
R5: FLO 12sc (12)
After completing R5, the stem should look like pic 1. Ch40-50 to create the hanging loop (adjust the number of chains to get your desired length, see pic 2). Then slst to the opposite side (pic 3).
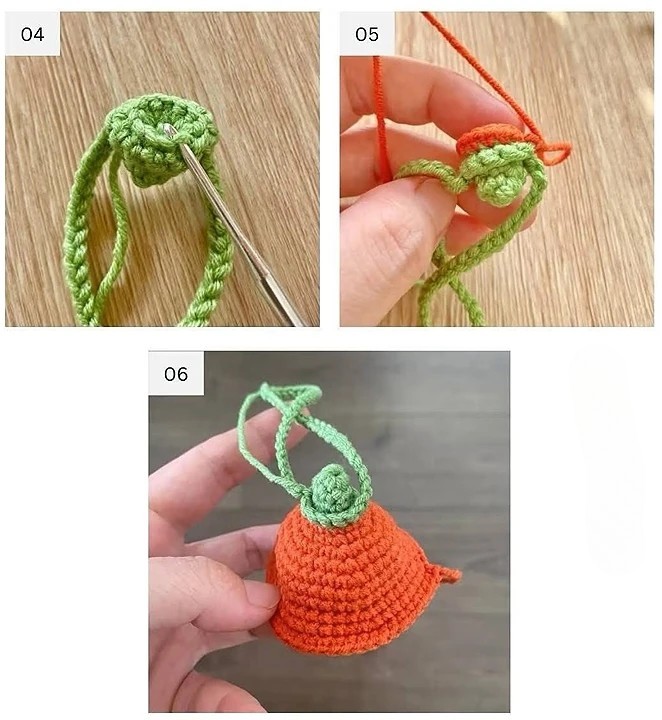
Part 2: Pumpkin Hat – using orange yarn
Since we used the front loops of R4 when making R5, the back loops of R4 are still available. With a new strand of orange yarn, insert the hook into the back loops of R4 of the stem and start working (pic 4, 5):
R1: BLO 12sc (12)
R2: (sc, inc) x 6 (18)
R3: (2sc, inc) x 6 (24)
R4: (3sc, inc) x 6 (30)
R5: (4sc, inc) x 6 (36)
R6-7(2 rounds): 36sc (36)
R8: FLO (5sc, inc) x 6 (42)
R9: (6sc, inc) x 6 (48)
R10: 48sc
Fasten off, cut the yarn and weave it in (pic 6).
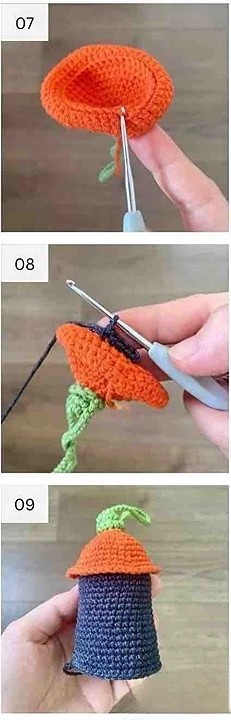
Part 3: Body – using black yarn
With a new strand of black yarn, insert the hook into the back loops of R7 of the pumpkin hat and start working (pic 7,8):
R1: BLO 36sc (36)
R2-12 (11 rounds): 36sc (36) R13: (5sc, inc) x 6 (42)
R14 16 (3 rounds): 42sc (42)
R17: FLO (6sc, inc) x 6 (48) R18-19 (2 rounds): 48sc (48)
Fasten off, cut the yarn and weave it in (pic 9).
Next, we’ll crochet a bottom piece to close the opening of the body.
BOTTOM
Using black yarn
R1: MR, 7sc (7) R2: 7inc (14)
R3: (sc, inc) x 7 (21)
R4: (2sc, inc) x 7 (28)
R5: (3sc, inc) x 7 (35)
R6: (4sc, inc) x 7 (42)
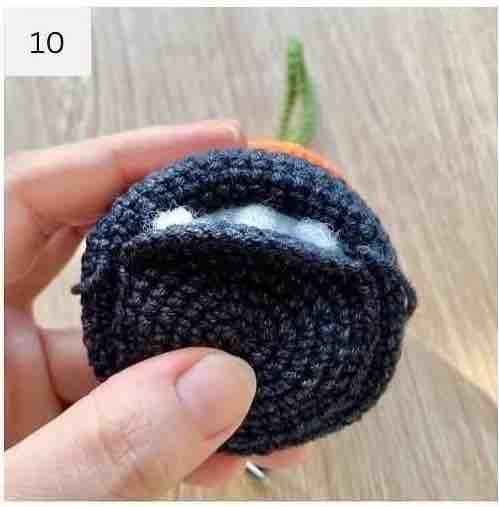
– Fasten off, cut the yarn and leave a long tail for sewing.
– Since we used the front loops of R16 of the body when making R17, the back loops of R16 are still available. Sew the bottom
piece to the back loops of R16 of the body, matching the 42 stitches on each part.
– Remember to stuff the body as you sew the bottom piece in place (pic 10).
FACE
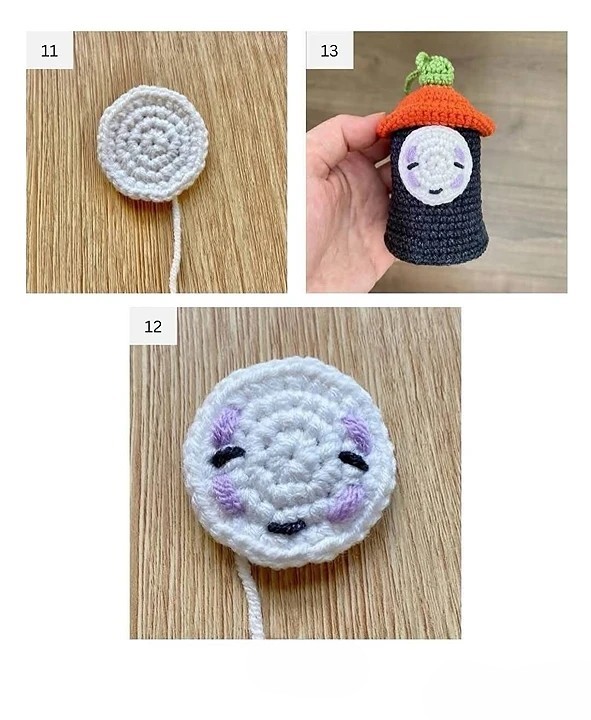
Using white yarn
– At the end of each round, slst into the first stitch, ch1, and continue with the next round. This will help the face look rounder compared to working in a spiral.
R1: MR, 8sc, slst (8)
R2: Ch1, 8inc, slst (16)
R3: Ch1, (sc, inc) x 8, slst (24) R4: Ch1, (2sc, inc) x 8 (32)
– At the end of R4, instead of making a slst, finish with an invisible fasten off, cut the yarn, and leave a long tail for sewing (pic 11).
– Use black yarn and purple yarn to embroider the face as pic 12.
– Sew the face to the body between R1 and R12 of the black body, right under the hat. Make sure the face is positioned correctly in line with the direction of the hanging loop of the chime (pic 13).
PUMPKIN BELL – Small one
Make 2, start with green yarn
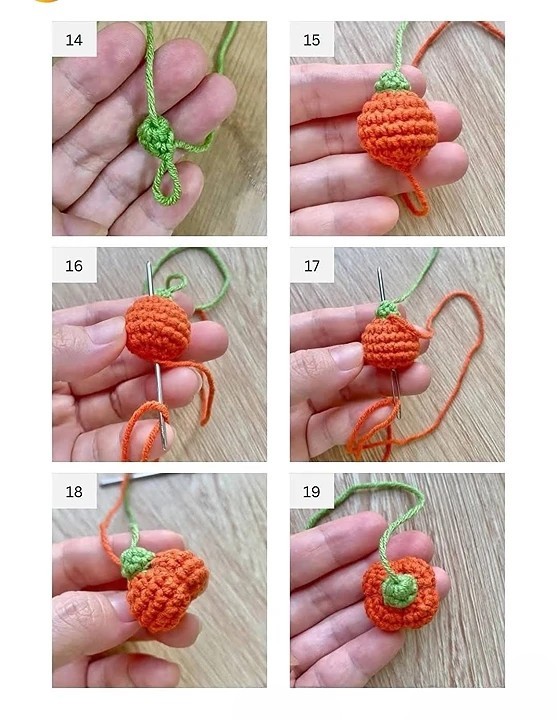
Leave a long tail before starting the stem; this will serve as the string for the bell.
R1: MR, 6sc (6)
R2: 6sc (6)
Thread the yarn tail that we left before making the stem through to the opposite side so that it comes out, forming the hanging string for the bell (pic 14).
Switch to orange yarn R3: BLO 6inc (12)
R4: (sc, inc) x 6 (18)
R5 – 7 (3 rounds): 18sc (18)
Stuff the pumpkin and continue to stuff as you go.
R8: (sc, dec) x 6 (12)
R9: 6dec (6)
– Fasten off, cut the yarn, close the remaining gap and leave a long tail for sewing (pic 15).
– Thread the yarn tail onto a needle, insert the needle from bottom to top, then bring it down over the top and insert it from bottom to top again. Pull the yarn tightly to create a groove for the pumpkin. Repeat until the pumpkin is divided into 4 sections (pic 16, 17, 18, 19).
PUMPKIN BELL – Big one
Make 1, start with green yarn
Leave a long tail before starting the stem.
R1: MR, 6sc (6)
R2: 6sc (6)
Switch to orange yarn
R3: BLO 6inc (12)
R4: (sc, inc) x 6 (18)
R5: (2sc, inc) x 6 (24) R6-8 (3 rounds): 24sc (24) R9: (2sc, dec) x 6 (18)
R10: (sc, dec) x 6 (12)
R11: 6dec (6)
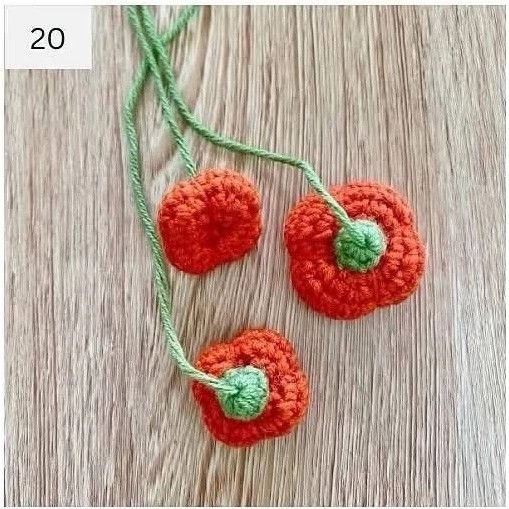
– Fasten off, cut the yarn, close the remaining gap and leave a long tail for sewing.
– Work the same way as the small pumpkin.
– Now we have 3 pumpkins shown in pic 20.
FINAL STEPS
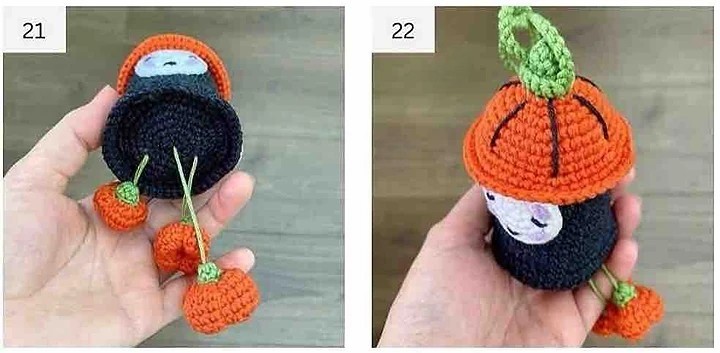
– Sew the pumpkins to the bottom of the body (pic 21).
– Use black yarn to embroider the hat (pic 22).
– Now you have finished the Pumpkin No-Face Chime.
All the patterns here are shared by me for free, there will be no payment required. Wishing you good luck with free Pumpkin no-face chime pattern. Don’t forget to follow our website ngoclanhandmade.com and Youtube channel @ngoclanhandmade regularly to receive free crochet patterns.