Seahorse crochet pattern

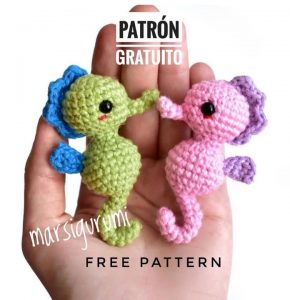
Free Seahorse crochet pattern
Hello friends. Today I will share with you the Seahorse crochet pattern. I hope everyone will enjoy this crochet pattern. This crochet pattern I collected from @loops_by_kat Head.
Abbreviations
MR – magic ring
Rnd (R) – round
ch – chain
st/sts – stitch/stitches
sc – single crochet
dc – double crochet
inc – increase (2 sc in one stitch)
dec – decrease (2 sc together)
hdc – half double crochet
ss – slip stitch
blo – back loop only
flo – front loop only
(..) – repeat the instructions in brackets the given numbers of times
Head
In turquoise
Rnd 1: 6 sc in mr (6)
Rnd 2: inc x 6 (12)
Rnd 3: (sc, inc) x 6 (18)
Rnd 4: (sc, inc, sc) x 6 (24)
Rnd 5: (3sc, inc) x 6 (30)
Rnd 6: (2sc, inc, 2sc) x 6 (36)
Rnd 7: (5sc, inc) x 6 (42)
Rnd 8-16: sc around (42)
Rnd 17: (5sc, dec) x 6 (36)
Rnd 18: (2sc, dec, 2sc) x 6 (30)
Rnd 19: (3sc, dec) x 6 (24)
Rnd 20: (sc, dec, sc) x 6 (18)
Rnd 21: (sc, dec) x 6 (12)
Rnd 22: dec x 6 (6) FO
Spikes
In turquoise
Rnd 1: 4sc in mr (4)
Rnd 2: (sc, inc) x 2 (6)
Rnd 3: sc around (6)
Rnd 4: (sc, inc, sc) x 2 (8)
Rnd 5-6: sc around (8)
Rnd 7: (3sc, inc) x 2 (10)
Rnd 8: sc around (10)
FO leaving tail for sewing.
Snout
The snout will start as a rough diamond shape and be folded in place to create the hollow look.
Rnd 1: 6sc in mr (6) (leave the starting tail, you will be using it to shape the snout later)
Rnd 2: sc around (6)
Rnd 3: (sc, inc, sc) x 2 (8)
Rnd 4: sc around (8)
Rnd 5: (3sc, inc) x 2 (10)
Rnd 6: (2sc, inc, 2sc) x 2 (12)
Rnd 7: (sc, inc) x 6 (18)
Rnd 8: sc around (18)
Rnd 9: (7sc, dec) x 2 (16)
Rnd 10: (3sc, dec, 3sc) x 2 (14)
Rnd 11: sc around (14)
Rnd 12: (5sc, dec) x 2 (12)
Rnd 13-14: sc around (12) ss and cut yarn with tail for sewing.
Pull the starting tail from the mr through the piece to make a semi-cone shape. Secure the tail with a few stitches to keep it in place and FO.
Body
Rnd 1: 6sc in mr (6)
Rnd 2: inc x 6 (12)
Rnd 3: (3sc, inc) x 3 (15)
Rnd 4-6: sc around (15)
Rnd 7: dec x 3, 9sc (12)
Rnd 8-28: sc around (12)
Rnd 29: inc x 2, 9sc, inc (15)
Rnd 30: sc around (15)
Rnd 31: (2sc, inc, 2sc) x 3 (18)
Rnd 32: (5sc, inc) x 3 (21)
Rnd 33: (3sc, inc, 3sc) x 3 (24)
Rnd 34: (7sc, inc) x 3 (27)
Rnd 35: (4sc, inc, 4sc) x 3 (30)
Rnd 36: (9sc, inc) x 3 (33)
Rnd 37: (5sc, inc, 5sc) x 3 (36)
Rnd 38: 16sc, (inc, 4sc) x 3, 5sc (39)
Rnd 39-46: sc around (39)
Rnd 47: 20sc, (dec, 4sc) x 3, sc (36)
Rnd 48: 14sc, (dec, 5sc) x 3, sc (33)
Rnd 49: (9sc, dec) x 3 (30)
Rnd 50: (4sc, dec, 4sc) x 3 (27)
Rnd 51: (7sc, dec) x 3 (24)
Rnd 52-53: sc around (24)
Rnd 54: 12sc, (sc, dec, sc) x 3 (21)
Rnd 55: sc 9. Pull loop through and FO leaving tail.
Roll up the tail and sew it in place.
Eyes
The eyes are worked around a chain. Make it in red.
Ch 4
Rnd 1: sc 2nd ch, sc, 3sc in last chain, turn and continue working on the other side of chain, sc, inc (8)
Cut the red yarn and FO.
Connect white yarn to the side of the eye and sc 4. Add the white on the opposite side of the other eye. The white is on the outer part of the eye. Embroider a black pupil.
Belly
In yellow
The belly is worked in rows.
Ch 7
Row 1: sc in 2nd ch, 5 sc, ch, turn (6)
Row 2: 6sc, ch, turn (6)
Row 3: 3sc, inc, 2sc, ch, turn (7)
Row 4-5: 7sc, ch, turn (7)
Row 6: 3sc, inc, 3sc, ch, turn (8)
Row 7: 8sc, ch, turn (8)
Row 8: 3sc, inc, 4sc, ch, turn (9)
Row 9: 9sc, ch, turn (9)
Row 10: 4sc, inc, 4sc, ch, turn (10)
Row 11: 4sc, inc, 5sc, ch, turn (11)
Row 12-13: 11sc, ch, turn (11)
Row 14: 9sc, dec, ch, turn (10)
Row 15: 8sc, dec, ch, turn (9)
Row 16: 7sc, dec, ch, turn (8)
Row 17: 6sc, dec (7) FO.
Connect yarn at row 1 and sc around the edge to neaten the shape. When done, cut yarn leaving long tail for sewing.
Fin
In yellow
Worked in rows.
Ch 11
Row 1: sc in 2nd ch, 9sc, ch, turn (10)
Row 2: 9sc, inc, ch, turn (11)
Row 3: inc, 10sc, ch, turn (12)
Row 4: 11sc, inc, ch, turn (13)
Row 5: inc, 10sc, ss, ch, turn (13) (row stops early)
Row 6: ss, 11sc, inc, ch, turn (14)
Row 7: 11sc, ss, ch, turn (12) (row stops early)
Row 8: ss, 10sc, ss, ch, turn (12)
Row 9: ss, 7sc, ss, ch, turn (9) (row stops early)
Row 10: ss, 5sc, ss (7)
FO.
Make 2 pieces. Put them together and sc through both layers around the piece. This creates one very stable fin.
Wishing you good luck with Seahorse crochet pattern. Don’t forget to follow our website ngoclanhandmade.com and Youtube channel @ngoclanhandmade regularly to receive free crochet patterns.
