Hairy Cactus crochet pattern

Free Hairy Cactus Crochet Pattern
In this article I will share with you the Hairy Cactus crochet pattern. The “Cactus Pelitos – Free Tutorial” pattern was designed by María Alejandra Perotti for JM Crochet Designs. Copyrighted. SALE OF THIS MODEL IS PROHIBITED. You can share this pattern mentioning the website ngoclanhandmade.com and JM Crochet Designs – María Alejandra Perotti is the designer.
The designer of this crochet pattern wanted to show you how to weave this beautiful opuntia microdasys cactus with its fluffy branches and delicate flowers. Measuring 18 cm and weighing just 35 grams, this adorable cactus is the perfect addition to your amigurumi collection. With its bright yellow flowers, it will bring a touch of joy and nature to your home. Follow the simple instructions and create your own “Pelitos” cactus in no time. Have fun knitting and bring this charming crochet cactus to life!”
MATERIALS:
– Cotton yarn 8/6 color to reddish brown, light brown, green, yellow
– 2.5mm and 3mm crochet hook
– Silicone fleece
– Scissors
– Wool needle
– Point marker
– Material to make a template (EVA foam, acetate, cardboard, adhesive tape)
POINTS AND ABBREVIATIONS:
MR – magic ring
sc – single crochet
inc – increase
dc – double crochet
st – stitch
sl st – slip stich
ch – chain
dec – decrease
hdc – half double crochet
blo – back loop only
flo – front loop only
(..) – repeat the instructions in brackets the given numbers of times
[..] – total numbers of stitches
The difficulty level is medium.
We are going to knit magic rings, single crochets or half crochets, increases and decreases.
To make this cactus we are going to use 8/6 semi-thick cotton yarn and a 2.5 mm and 3 mm crochet hook.
The cactus measures 18 cm high and 12 cm wide and I have used approximately 30 grams of yarn and 5 grams of fleece.
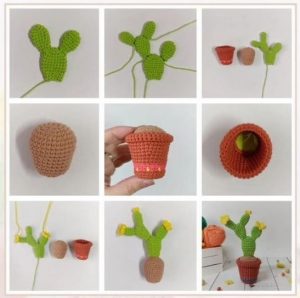
The cactus is made up of the following pieces:
• Flowerpot
• Land
• Cactus body: made up of 5 pieces
• Flower
Now yes… Hands to the needles!
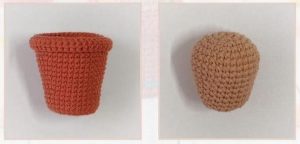
FLOWERPOT:
We will work the cactus pot with reddish brown yarn and a 3 mm crochet needle. This pot, if you knit it with yarns similar to mine, measures 4 cm in diameter and 6 cm in height.
1: MR, 8 sc (8) Place a stitch marker in the first stitch to mark the start of the round.
2: (1 inc) x 8 (16)
3: (1 sc, 1 inc) x 8 (24) 1 sl st in the first sc of the round and we go up 1ch. We will only work this round and round 4 in this way, then we continue knitting in a spiral.
4: 24 sc taking BLO (24) 1 sl st in the first SC of the round and we go up 1 ch.
5-7: 24 sc (24)
We can place a template to give better stability to the base of the pot. We simply cut a 3 cm circle out of cardboard, EVA foam or acetate and glue it to the base of the pot.
If you want to make some color guard in the pot you can do it by changing the color on rounds 6 and 7.
8: (5 sc, 1 inc) x 4 (28)
9-10: 28 sc (28)
11: (6 sc, 1 inc) x 4 (32)
12-13: 32 sc (32)
14: (7 sc, 1 inc) x 4 (36)
15-16: 36 sc (36) 1 sl st in the first sc of the round and we go up 1 ch.
17: 36 sc taking FLO (36) 1 sl st in the first SC of the round and we go up 1 ch.
18: 36 sc (36) 1 ch in the first stitch of the round. We close, cut and hide the strand.
LAND:
We will work the cactus soil with brown yarn and a 3 mm crochet needle.
1: MR, 6 sc (6) Place a stitch marker in the first stitch to mark the start of the round.
2: (1 inc) x 6 (12)
3: (1 sc, 1 inc) x 6 (18)
4: (2 sc, 1 inc) x 6 (24)
5: (3 sc, 1 inc) x 6 (30)
6: 30 sc (30)
7: (13 sc, 1 dec) x2 (28)
8-9: 28 sc (28)
10: (5 sc, 1 dec) x 4 (24)
11-14: 24 sc (24)
15: (4 sc, 1 dec) x 4 (20)
16: 20 sc (20)
17: (3 sc, 1 dec) x 4 taking BLO (16)
18: (1 dec) x 8 (8) 1 sl st in the first stitch of the round. We close, cut and hide the strand.
BODY:
We will work the body of the cactus with green yarn and a 3 mm crochet hook. The body is made up of 5 pieces.
Body piece 1:
1: MR, 6 sc (6)
2: (1 inc) x 6 (12)
3: (1 sc, 1 inc) x 6 (18)
4-8: 18 sc (18)
9: (1 sc, 1 dec) x 6 (12)
10-11: 12 sc (12) We close, cut the thread leaving a thread long enough to sew to the ground piece. You can add some filling or leave the piece flat.
Body piece 2:
1: MR, 6 sc (6)
2: (1 inc) x 6 (12)
3-6: 12 sc (12)
7: (2 sc, 1 dec) x 3 (9)
8: 9 sc (9)
9: (2 sc, 1 dec) x 2, 1 sc (7) We close, cut the thread leaving a thread long enough to sew to piece 1 of the body. You can add some filling or leave the piece flat.
Body piece 3:
1: MR, 6 sc (6)
2: (1 inc) x 6 (12)
3-7: 12 sc (12)
8: (1 dec) x 6 (6) We close, cut the thread leaving a thread long enough to sew to piece 1 of the body. You can add some filling or leave the piece flat.
Body piece 4:
1: MR, 4 sc (4)
2: (1 inc) x 4 (8)
3-6: 8 sc (8)
7: (2 sc, 1 dec) x 2 (6)
We close, cut the thread leaving a thread long enough to sew to piece 2 of the body. We do not put filling.
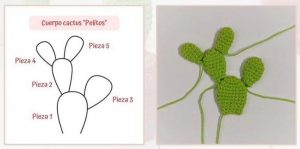
Body piece 5:
1: MR, 4 sc (4)
2: (1 inc) x 4 (8)
3-7: 8 SC (8) We close, cut the thread leaving a thread long enough to sew to piece 2 of the body. We do not put filling.
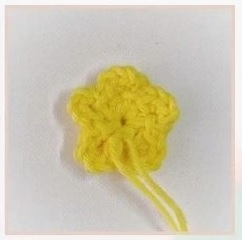
FLOWER:
We will work the little cactus flowers with yellow yarn and a 2.5 mm crochet needle. We can knit 2 or 3 equal pieces.
1: MR, (5 ch and 1 sl st in the MR) x 5. We do not adjust the MR yet.
2: (5 sc embracing the 5 PC, 1 sl st in the MR) x 5. We close and adjust the MR.
We leave a thread long enough to sew to the body of the Cactus.
CACTUS ASSEMBLY:
1- We take piece 1 of the body of the cactus and on the upper part we sew piece 2 of the body to the left and piece 3 to the right.
2- On piece 2 of the cactus body, at the top we sew pieces 4 to the left and row 5 to the right.
3- We introduce the piece of soil into the pot.
4- We sew the body of the cactus centered on the top of the earth piece.
5- We sew the yellow flowers onto the body of the cactus.
 And so we come to the end of this knitting guide. I hope you enjoyed knitting your own “Pelitos” cactus. This fluffy little friend is sure to brighten your day with the natural charm of him.
Remember that creativity in the world of amigurumi has no limits, so feel free to customize it and experiment with colors and textures.
If you liked this free pattern, be sure to continue exploring the world of crochet and amigurumi. There are endless possibilities to create unique and adorable creatures. Thank you for choosing this pattern and happy knitting!”